Tuesday, December 18, 2012

Spicy Garlic Chutney (Teekha Lahsun Chutney)

Best Blogger Tips
Necessity is the mother of invention. And if not invention then atleast the attempt to rediscover. All these years of living in Maharashtra and Gujarat got me really hooked to Vada Pav. And coming back to Delhi, if it was one thing that I missed it was the simple vada tucked away in a bun which had been smothered with a dry garlic based chutney. The only place that came close to satisfying this urge to have vada pav was the food stall in Dilli Haat and at what expense. You spent hours dodging the Delhi traffic and then fighting your way to get a decent parking, since Dilli Haat happens to be in a crowded place. Once you had parked your car, you stood in a queue to buy your ticket and if your luck was really rotten the queue would end up snaking right till the edge of the road and you will have to wait a good 20 odd minutes to buy your ticket. Once you bought the tickets, you would go through security, and then through swarms of people and handicraft shops to the Mumbai food stall. There you would get your taste of Mumbai street heaven for 70 rupees only. There was a time, I just hopped across the street in Mumbai to buy my vada pav for 5 rupees  If I was in an indulgent mood, I would also throw in a cutting chai from the tea vendor next to the vada pav wala. But then good times don't last, memories however, do.
I digress. Coming back to the point of Vada Pav, it was the dry garlic chutney that lifted this simple fritter in a bun to greatness. And all these years this dry chutney which had been readily available in supermarkets kept my craving at bay. Not recently though. We decided to make some vada pav at home. Making the vadas was a piece of cake and pavs these days are available across the country thanks to the national liking for Pav Bhaji. Still one bite and something was found missing, and as al of us in the family looked at each other with the "Mazaa nahin aaya" look (didn't get the excitement), the eureka moment hit us. It had been the chutney all along. The simple spicy garlic chutney which stared at us innocently from the supermarket aisles with a 'take me home' look. A sudden dash to the all the supermarkets nearby only yielded disappointment. No one stocked it up here and I was in no mood to scout the entire Delhi and Gurgaon market space for it. So, made a few frantic calls to my Gujju and Maharashtrian friends and made it on my own.
It was easy to make that I made a few jars. Later that evening at a party, this simple chutney stood out amongst all the dishes prepared and the requests literally poured in to supply them with a few jars if not the recipe. Well, here is the recipe, try it out and give me shout as to how it went. All I can tell you is, that I think I will be making this every few days since my better half seems to be having this with everything. Thankfully, I can now firmly think that it has displaced the gunpowder, which found its way on her plate with every meal. Not that I have anything against the gunpowder..I just like this one better.
And as for the Vada Pav, the recipe for the bondas (the vadas dear) will follow in the next post. Till then prepare this chutney and save it up for the vada pavs.

Spicy Garlic Chutney

Ingredients:
Garlic, peeled and minced finely - 60 gm
Green Chilies, minced finely - 20 gm
Dessicated Coconut - 30 gm
Peanuts - 20 gms
Sesame seeds - 20 gms
Hing (Asafoetida) - A pinch
Red Chili Powder - 10 gms
Cumin Powder - 5 gms.
Salt to taste
Oil - 5 ml.

Method:
1. Roast the peanuts and sesame seeds slightly till the raw smell goes. Do not burn them. Wait till they are cool, then make a dry powder of them in the processor.
2. Heat oil in a pan. Add in the hing and as it crackles, add in the minced green chilies. Cook for 30 seconds.


3. Add in the minced garlic and cook for a minute.

4. Add in the dessicated coconut. Cook for a couple of minutes till it changes color. Do not let it brown.

5. Switch of the flame and add in the cumin powder, red chili powder and salt. Mix well. You will notice that the entire mixture now looks totally red.

6. Add in the powdered peanuts and sesame seeds. Mix well.

7. Taste and adjust seasoning.

Note - The quantities given can be adjusted by you based on your preferences and tolerance to spices, esp. red chili powder.

Saturday, December 15, 2012

Rocket Leaves (Arugula) Pesto

Best Blogger Tips
Last month, I made my first trip to the famed INA market. I must say, it was embarrassing for me to state that being a foodie I had never visited the INA market ever in my life. I mean, the place is supposed to be a mecca for foodies to get their ingredients and in numerous conversations with other foodies, I have been told to go to the place for my wishlist. So, a weekend trip to the Dilli Haat resulted in me getting the opportunity to visit the market and it was such a big let down. I am sure, this last statement must have upset a few fans of the market, but believe me there was nothing out of the blue that I got there. The condiments available there are available at every grocery store these days.The vegetables and fruits with the vendors lacked in variety. The weekly mandi every Thursday close to my house has a better variety and I get my hands on some excellent stuff. Still, having been there, I decided to get something, atleast a reminder of my visit and that is when we picked up rocket leaves. Fresh from the basil pesto experience, my better half wanted me to make her rocket leaf pesto and I could not turn down this request. So rocket leaves in my shopping bag, we were back to try out the rocket leaves pesto.
As with basil, rocket leaves pesto is easy to make and use later. The peppery and nutty taste of Rocket leaves (Arugula) really lifts up the pesto and rather than making it an alternative to basil pesto really gets you hooked just like it did in our household. 

Rocket Leaves Pesto

Ingredients:
Rocket Leaves - A large bunch
Garlic Cloves, peeled - 3
Walnuts - 50 gms
Parmesan cheese, grated - 50 gm
Pecorino, grated - 50 gm
Olive Oil - 150 ml
Sea Salt

Method:
1. Sort the rocket leaves to discard thicker stalks and unwanted leaves.
2. Add the walnuts, garlic cloves and cheese in a mortar and pound for a few minutes.
3. Add in the rocket leaves and pound again with the pestle for a few minutes.
4. Add in the olive oil and sea salt. Pound with the pestle till a homogeneous mixture is formed.
5. Add more olive oil if necessary. Taste and adjust the seasoning.

Note: Incase using a processor. blitz all the ingredients to form a mixture. Keep adding olive oil as you process. Do not process for long for risk of having the blades of the processor discoloring the leaves.


Wednesday, November 21, 2012

Shahi Murg Korma

Best Blogger Tips
Diwali is over and the wait for the next big festival continues. It was a very hectic diwali this time around. There were quite a few taash parties (Card Parties) that we did manage to attend and yes, I did win at most of them, especially the big one on Diwali. There was a lot of socializing, sweets, fireworks (yes it is customary and we did our own small fireworks thing for a little while) and the weekend after Diwali we went over to a friends place for dinner. Though, it was supposed to be a quiet evening with him cooking some of his famed mutton curry for us, since it was the first time at his place, I decided to carry a rich, aromatic korma dish for him. I fell in love with the shahi korma and since I only had the mutton curry at his place I came back determined that I needed to cook it again and that is what I did this week. A look at the ingredients and you are sure that its a winner all the way, with the purdah(veil), the rich dry fruit and the rose petals. The shahi masala and paste do take some work, but believe at the end, the delicate curry is really worth the preparation you put in.

Other Korma recipes on this site:
Asafjahi Korma
Murg Dahi Dhania Korma
Murg Korma
And of course, the Korma Ki Biryani

Shahi Murg Korma

Ingredients

Chicken drumsticks - 8
Ginger Garlic Paste - 40 gm
Fried onion paste - 60 gm
Fried garlic paste - 20 gm
Yogurt, whisked - 200 gm
Saffron, soaked in 1 Tblsp of warm milk - 1 gm
Red Chili Powder - 2.5 tsp.
Chicken stock - 1/2 cup
Cream - 60 gm
Ghee - 3 Tblsp
Salt - To Taste

Shahi Paste
Almonds, blanched and peeled - 30 gm
Raisins, washed, soaked and refreshed - 20 gm
Pistachio, blanched and peeled - 15 gm
Poppy Seeds (Khus-Khus), soaked in luke warm water for 10 minutes - 15 gm

Shahi Masala
Cumin Seeds - 10 gm
Cloves - 5
Green Cardamom - 8
Black Peppercorns - 10
Cinnamon, 1" sticks - 3
Mace - 1 flower
Nutmeg - 1/4
Dried Rose petals - 14

For the Purdah
Flour
Water
Salt
Ghee
(The quantity depends on the lagan/handi being used. The dough needs to be rolled out to cover and seal the entire lagan/handi)
Egg white - 01 egg


Method:
1. Rub the chicken drumsticks with ginger garlic paste and salt. Keep aside for 30 minutes.

2. Put all ingredients for the shahi paste in a blender, add in 4 tblsp of water and make a paste. Keep aside.

3. Add all the ingredients for the shahi masala in a mortar and pound with a pestle to make a powder. Keep aside.

4. Heat ghee in a handi. Add in the fried onion and garlic pastes. Cook for 2-3 minutes on a medium high flame.

5. Take off the flame and add in the yogurt. Stir well to mix, so that the yogurt does not separate. Return back to the flame and cook till oil separates to the sides (approx. 5 minutes).

6. Add in the chicken drumsticks and cook for 3 minutes. Add in the shahi masala. Mix well and cook for another 3 minutes. Add in the red chili powder. Mix well and cook for another minute.

7. Add the remaining marinade and 1/2 cup chicken stock. Cook for 10 more minutes on medium flame or till chicken in half done.
8. Add in the shahi paste. Mix well and cook till chicken drumsticks are almost done. Adjust seasonings if required.

9. Take the handi off the flame. Separate the chicken drumsticks and arrange them on a lagan/flat pan or a large handi/pan.

10. Pass the gravy through a sieve and pour the gravy on top of the chicken drumsticks.
11. Evenly spread the cream on top and the saffron.
12. Make a dough with Flour, ghee, salt and water. Roll out the dough into a large round shape and cover the lagan/handi to seal it from all corners.

13. Either put in oven at 160 degrees celsius for 15 minutes or put a tawa/hot plate on flame and place the lagan on top, cook for 15 minutes on medium flame.

14. Open the purdah (the dough seal) at the time of service and let the aromas fill the room. Nedless to say, serve hot.

Friday, November 16, 2012

India According to Gastronome by Choice

Best Blogger Tips
Happy Belated Diwali to all. Its been a great festive season out here in India and going by the crowds on the streets in Delhi and in the shops everyone was in the festive spirit. With work taking a backseat for a while and some time on my hands, I decided to make a culinary map of India and there were so many delights from each region to add that the space literally ran out. Now I could have taken the easy way out and just filled the map with one word, Curry, but that would not have been the India map according to me but to some one from outside India. Similarly, within India, being a North Indian ,I could have filled up loads of delicacies up north and then only added Idli and Dosa for whole of south, Dhokla and Vada Pav for West and Momos for East of India. And for someone down south of India, North would have meant only Butter Chicken and Whisky. But India is so much more. It is a pure gastronomical delight with varied cuisines across regions and some exciting culinary masterpieces, some of which in today's date have crossed over to a different region and assimilated so much in the day to day meals that it is impossible to figure out what the origin is. This attempt of mine is not only a very amateurish attempt at working on graphic software but documenting these culinary masterpieces and staples across regions. See it and enjoy it. I hope someday, I can look back at this and proudly declare as having not only eaten all of this but also cooked all of them up.

 Please click on the pic to see the enlarged map and culinary delights :)

Sunday, November 4, 2012

Bombay Sandwich - Delhi Style

Best Blogger Tips
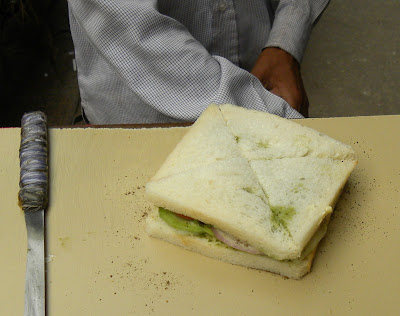
3 Years of my college life were the best years of my life till date. The fact that they were spent in Bombay (I still refuse to call it Mumbai), makes me in love with the city. I still cannot figure out as to whether those years were a blast because of Bombay or did I fall in love with Bombay because of my college life. Since then, everything Bombay and I feel an instant connection. Take the Bombay sandwich for example. I never had the Bombay Sandwich while I was in the city. It was mostly about Vada Pav those days, or sitting in the Irani Restaurant behind college every evening and having Bun Maska and cutting chai. Bombay Sandwich came much later...3 years after Bombay to be precise, when I was posted in Vadodara. There was this vendor just outside the Hotel where I used to work who prepared this and it was the ideal snack, especially since I was bored out of my skull having restaurant food daily. Since then, I have been in love with Bombay Sandwich and during my trips back to Bombay have tried it out on a few occasions. So, last week during my Old Delhi trip to eat some yum food, I chanced upon this vendor selling Bombay Sandwich and I had to try it out. After all, this was my way of still maintaining my connect with the maximum city.
Now the Bombay Sandwich made in Old Delhi was totally different from the ones available in Bombay. The beetroot slices did not find their way into the sandwich and grated cheese was replaced by good old paneer (Cottage cheese). In the end, he did not toast the sandwich (which I pointed out to him) and my favorite was missing, which being the accompaniment - like sprinkled sev on top or some potato wafers or best even more grated cheese on top.
So have a look at this variation available in the bylanes of Old Delhi and till I post about the Real McCoy in Bombay, this will have to do till then.
Take 2 slices of bread and smear butter on one end of each slice. Then apply some mint chutney.

Layer one bread with sliced boiled potatoes.

Now add a layer of sliced cucumber

Sprinkle some sandwich masala. Most call this their secret to a great sandwich. I just think this is chaat masala and  black pepper.

Add in some onion rings. 

Followed by slices of tomatoes. Now this is when Beetroot slices should follow also, but this is Delhi style..need to be hatke.

And it totally deviates from here and starts looking like a Delhi Sandwich. Add in a slice of paneer (I still love my grated cheese on top). Sprinkle some more secret masala.

Cover with the second slice. The sandwich is almost done.

Purists...dont cringe. I know he should toast it to get the real Bombay style sandwich, but like I said earlier, this is a distant copy. He just cuts it in 4 triangles to make them bite sized.

A sachet of ketchup (now I love the toppings I got in Bombay) and you are ready to bite into it.

Saturday, November 3, 2012

Old Delhi Food Trail - A Photo Essay (Part I)

Best Blogger Tips
Every once in a while I have this urge to try the real street food of Delhi and that is when I make my trip to Chandni Chowk. Over my last few trips, many of my friends have joined me to walk through the always crowded by lanes of Chandni Chowk, Chawri bazaar and nearby areas to savor some of the tastiest food available. The choices on display blow your mind and it is impossible to miss the food stalls and little shops as they cater to a thronging crowd of hungry visitors daily.
These are some of the images that I captured in between digging into tasty chaat and searching for some legendary food outlets.

Chandni Chowk - the mere mention brings up memories of some tasty chaat vendors and the best chaat in Delhi.

Bishan Swaroop

Sultan Kulle Wala


Ashok Chat Corner

Not just chaat, the area is brimming with snacks and food from everywhere.
Bombay Sandwich in Delhi


Panna standing at Nai Sarak has some tasty Moth Kachori..try it if you havent till now.
Incase regular kachoris are what you crave then make way to Jung Bahadurs Kachori shop

And how can you be in Delhi and not try Matra Kulcha. 
And talking of Matra, Rameshji in Kinari Bazaar serves the best Matra Kulcha in town.

A trip to Chandni Chowk will be incomplete without a mention of Parathewalli Galli. The atmosphere and the crowd eating there at any time is to be seen even if oily fried parathas are not your choice of food.


And it is impossible to roam the area and not catch the countless hawkers selling nankhatai.


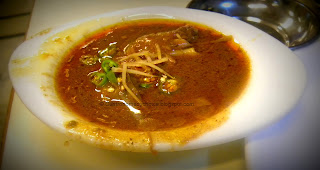
Going to the old Delhi area and not making a trip to Karim's is totally unpardonable, unless you are a vegetarian. Famed for its mutton preparations, the lamb Nihari and tandoori roti for breakfast are a must do, though they even serve it in evenings for a few hours.
M in front of Karims entrance - should I order the Nihari, Paya, Qorma or all three ?

The Tandoori Roti and Nihari are a perfect couple :). Try it at Karims or Al-Jawahar. Which one is better? Well, the jury has been undecided for all these years.


This happens to be the breakfast crowd at Shyam Sweets. Try out their Bedmi Pooris.

 Enough of oily and calorie filled food...try the fresh fruit instead.

There is also a lot to satisfy your sweet tooth

Rabarhi


And how can one forget Daulat ki Chaat. Only available for a few months of winter, I cant wait for it this year. Another few weeks to go I guess.

And the Khurchan at Hazarilal Jain...yum!


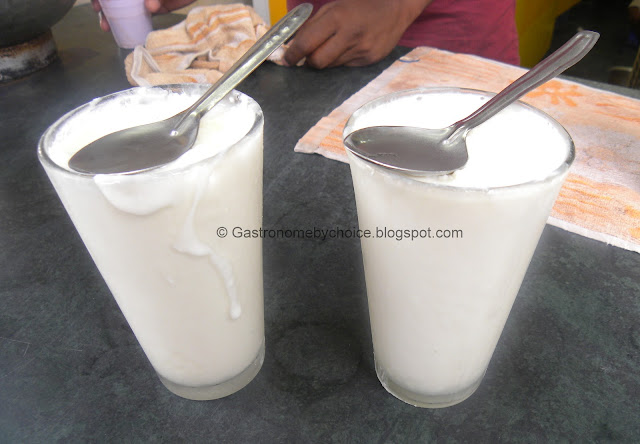
And the best way to finish off everything you ate is by way of a thick lassi at Amritsari Lassiwaale near Fatehpuri gate.

 
Design by Free WordPress Themes | Bloggerized by Lasantha - Premium Blogger Themes | Laundry Detergent Coupons